
Do you know what a huge eyeopener was to me? Anyone can take great photos. Read that again: anyone can take great photos! You do not have to be a professional photographer to take better photos! You don’t even need the most expensive camera and camera gear. Simply change small things like a different position or a good composition. This will already make a huge difference!
If you want to take better photos, pay attention to your composition.
If you want to make great photos, set your camera on manual mode and start shooting in RAW file format. When you shoot in RAW this will give you the best opportunities to edit later on.
If you want to take excellent photos, invest time, energy and keep photographing and learning.
If you have never taken photos in manual mode before, it can be quite overwhelming at the start. However, if you follow the step-by-step instructions I will provide in the next two months, all will be clear.
I started in 2019 taking photos in manual mode and trying to understand aperture, ISO value, and shutter speed. It took me ages to set up my camera and I was very insecure. Especially when you are photographing kids, you want to be fast since kids, in general, do not want to pose for longer than a few seconds to minutes. So I just let the kids play while I was setting up my camera and when I was finished I asked them to stand in my frame. After a few months, I started to understand my settings and I was able to switch quickly with my settings depending on the scene I wanted to capture. I also took several courses (Zoom Academy, Kijk en Zie Fotoschool, and courses by Tim Shields) to improve my photography skills.
In this section I will go through several camera settings (Aperture, ISO, Shutter speed), I will discuss composition and I will also provide several examples on how to capture your best travel moments in a great way. I will discuss landscape photos, sunset photos, photos at the beach, and much more!
Photography
Photography means writing with light and you need to understand and know how to write best with light and make great photos.
The three determinants that determine the exposure in your photos are:
In this article I will discuss each of these determinants extensively.
Aperture
What is Aperture?
Aperture is defined as the opening in a lens through which light passes to enter the camera. Aperture has several effects on your photography.
How aperture affects exposure
With a large aperture, the opening in your lens is bigger and allows more light to reach your camera sensor. This results in a brighter image. A large aperture corresponds with a lower f-number or f-stop (e.g., f/2, f/4).
With a smaller aperture (e.g., f/12, f/16), the opening in your lens is smaller and allows less light to reach your camera sensor.

Here are some photos taken with a different aperture to show the effect on light and exposure.


It is obvious your photos will turn out brighter with a larger aperture and darker with a smaller aperture.
How aperture affects depth of field
Besides the amount of light that is able to reach the sensor, aperture also controls depth of field and can add a huge creative feature to your photos in this way.
Depth of field is the part in your photo that is sharp from the foreground to the background.
You will achieve that wonderful blurred foreground and blurred background around your in-focus subject with a large aperture. This is what most people aim to achieve when shooting a portrait or when they want to isolate a subject.
With a large aperture, you will see more blur to your foreground, background and thus less depth of field. This is often called bokeh.
With a smaller aperture (e.g., f/8 – f/14) , more of the photo will be sharp and in focus. A smaller aperture means more depth of field. You will capture sharp photos from the foreground to the far horizon. Keep in mind that any object with the same distance to the lens will be equally sharp.
Have a look at the photos below to understand how aperture affects the depth of field.


How aperture affects sharpness
Have a look at the photos below to understand how aperture regulates sharpness. The photo on the left only has the flowers in focus and sharp, with a blurred foreground and background. The photos in the middle and in the right have much more details in focus and sharp, from front to back.


You cannot increase aperture to the maximum and expect the sharpest photos. At a certain point, there will be too little light allowed to pass through the lens which results in a less sharp photo. This phenomenon is called diffraction. Whenever this happens depends on a variety of factors, like the size of your sensor. Usually it is not advised to set your aperture higher than f/16. You can try it out with smaller apertures on your own lenses to investigate at which aperture diffraction happens.
It will also probably happen that your lenses are blurrier at some apertures, or in the corners of your photos. This is called lens aberrations, meaning problems caused by your lens. Some lenses are of higher quality than others, still this is a problem almost inevitable. Most lenses produce the sharpest captures around f/4 – f/8.
In short:
How to pick the right aperture?
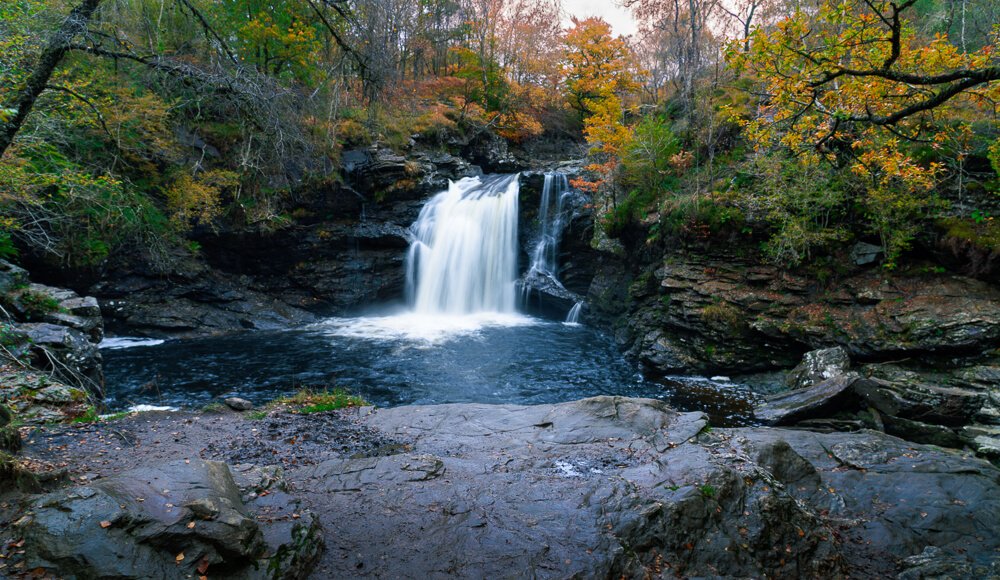
When you shoot landscapes, you will want as much as possible to be in focus. I would recommend an aperture of f/8 to f/13. A small aperture results in more depth of field. When shooting at sunrise or sunset, a lot of light will enter the lens so you can choose a higher aperture (f/11 , f/12). In the landscape photo below, I used a small aperture to make sure my foreground and background were as sharp as possible.

If you want to achieve a starburst effect with the sun, you need to decrease your aperture (f/12-f/16). The shape of the starburst depends on your aperture blades and is different from lens to lens.

When you want to photograph architecture or a group of people, you can choose an aperture of f/8-f/11 in order to have everything or everyone sharp. Stand at a distance to your subject.

When you shoot a portrait, you probably want to isolate your subject and set your aperture to f/2.4 – f/5.6. Use a tripod at larger apertures (lower than f/4), focus on your subject and ensure a big distance between your subject and the background for a blurred effect.
The best way to fully understand aperture, is to start practising. Choose aperture mode on your camera, focus on your subject and start shooting with variable apertures. Good luck!
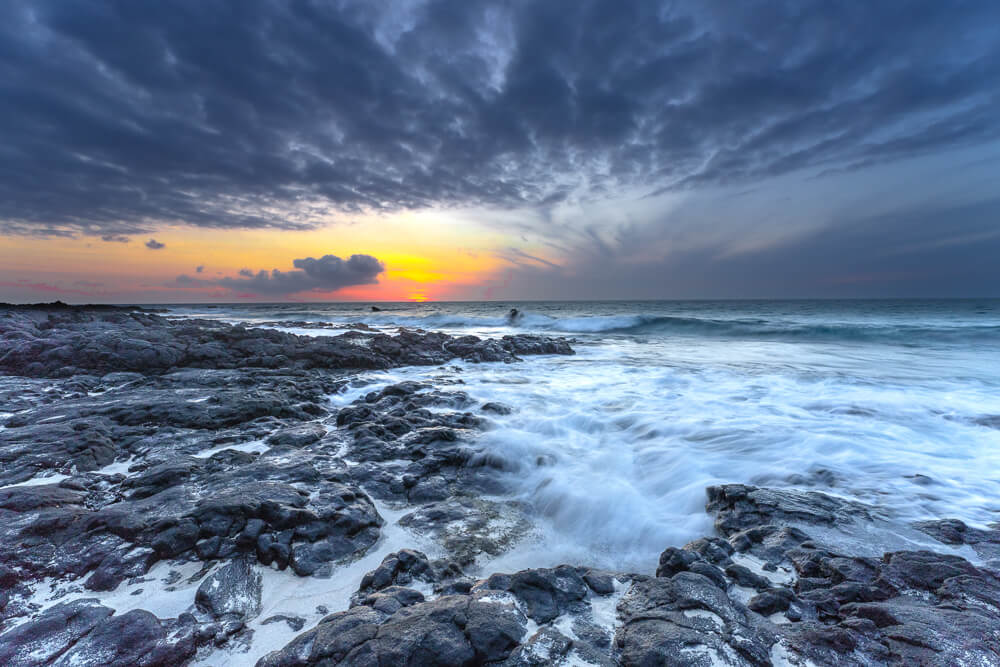
Why use an ND filter
Neutral density filters are often used in landscape photography, when your camera settings are simply just not sufficient enough to prevent overexposure. For instance, when you are shooting in bright sunlight or if you want to take long exposure photos. An ND filter is an excellent solution when some areas in the photo are too bright for the camera settings you are using.
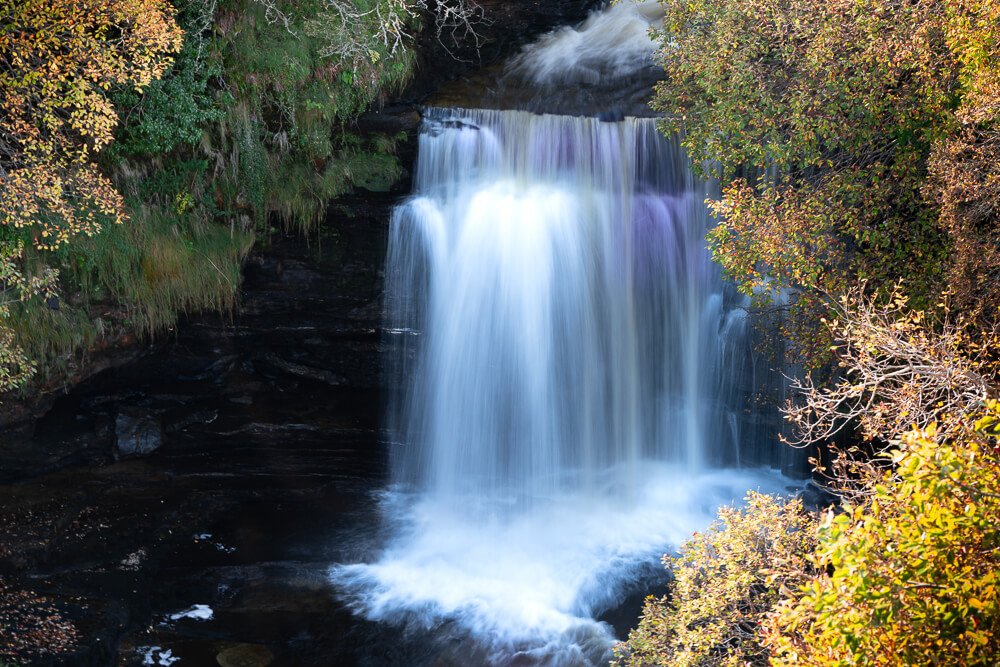
Long exposure photography
Neutral density filters are also commonly used when you want to blur movement, especially images in constant motion such as waterways, rain, waterfalls, or people on a busy streets.
You must have seen photos before of a waterfall or a stream where the water looks silky smooth. Such photos were taken with an ND filter and a longer shutter speed.
With long exposure photography (a longer shutter speed) you can create motion blur. A longer shutter speed means more light enters your lens, which means your image will easily be overexposed. This is when you need an ND filter.

Effects of an ND filter
An ND filter works like sunglasses for your camera. It restricts incoming light reaching your sensor.
With an ND filter, you will capture:
You might think: instead of using an ND filter, why not increase my aperture and lower my ISO when I shoot with a longer shutter speed, to prevent excess light in my photo? Well, this might not be enough. Also, you will most likely not get the same drama, correct colors and contrast in your photo compared to photos with ND filter. You will get a higher image quality with an ND-filter than you would if you adjusted your photo in post-processing. It is a difficult, even impossible task to recover details from overexposed areas. This is a photo I took at sunset without an ND filter.


When use an ND filter
Depending on the strength of the ND filter, the scene you are about to photograph is darkened to a certain extent.
An ND filter allows you to capture various scenes without overexposure:

Which ND filter do you need?
Neutral density filters are designed in many different types and intensities. Filters are classified based on the “stops” of light (opacity) by which they darken an image. A 1-stop ND filter blocks only a small amount of light, while a 10-stop ND filter darkens the image significantly more.
The recommendations mentioned below are usually correct. However, keep in mind that weather conditions can significantly change how the day and subsequent photography turn out. Always check the weather forecast beforehand.
Best ND Filters during the day: 6-stop ND filter and 10-stop ND filter
The neutral density filters that are best for the morning time, during the day, and after sunrise when the sun is at its brightest, are the darker ND filters. The 6-stop ND filter and the 10- stop ND filter are great options under such circumstances.
These filters are also ideal for smoothing water and blurring clouds with shutter speeds of several minutes.
A higher 15-stop ND filter is perfect for managing extremely bright light and can even capture images with the sun directly in the frame.

Best ND Filters during golden hour:
The golden hour happens during sunset, the last hour of the day. To capture sunset sceneries, use the 6-stop ND or 4-stop ND filter. They are both great options to capture the warm and colorful scenery.
Best ND Filters For Nighttime
A 2-stop or 3-stop ND filter is the best filter to enhance light activity while giving your image a smooth effect in the dark. Remember to keep your ISO low, to keep digital noise low especially when it comes to post processing photos with a high dynamic range.
Several types of ND filters
Variable neutral density filter
A variable ND filter is a singe filter that can be adjusted to restrict different stops of light. This means you do not need to purchase several different filters.
The neutral density (ND) filter on the other hand, has a filter for each stop value. When you use neutral density filters, you change the different filters depending on how much light you want to block.
Many photographers prefer ND filters instead of a VND since manually swapping filters offers more precision control during shooting.
Graduated filters
Graduated ND filters, also called GND filters, have a changing extent of darkening across the filter. Common ND filters have the same amount of darkening across the entire filter.
GND filters can be darker on one half and lighter on the other half; this type of filter is ideal for outdoor photos with the sky. The darker top restricts more light from the sky coming in while retaining the colors of the sky, and with the lighter bottom you can capture more details and light on the ground.
There is one problem with graduated ND filters: they only work well if the horizon is perfectly straight with nothing sticking up into the sky. If there are trees, rocks, buildings, or anything else sticking up into the sky, then the filter will darken that part too.
Another approach instead of a graduated filter is to shoot with two exposures, one exposed for the sky and one exposed for the foreground and combine them in post-processing.

How do STOPS correlate with shutter speed?
ND-filters are usually referred to as having a certain value of heaviness.
In the table below the stops the value of the filter classifications are compared to the number of stops to restrict light.
You will see that for every 0.3 increase in ND heaviness, there is 1 more STOP of darkening.
ND filter classification- number of stops darkened
Which ND filter do you choose when you shoot with longer shutter speed?
With an ND filter and a lower shutter speed, you need to remember: 1 stop of ND filter will enable you to shoot with half the shutter speed you chose before , without the ND filter. 2 stops will half your shutter speed twice. 3 stops will half your shutter speed three times.
Some examples:

What is the effect of a polarizer filter?
If you carry a polarizer in your camera bag; remember a polarizer filter cuts 1 STOP of light! This is similar to a 0.3 ND filter!
Why do you need a remote control?
A remote shutter release is a little device that overrides your shutter to allow you to shoot exposures as long necessary; far beyond the 30 second limit on most cameras in Manual mode.
Shooting tips for long exposure photography with an ND filter
The best scenario to photograph with long exposure photography is a scene with some movement in it. A running waterfall, clouds moving in the sky, rolling waves in the ocean all make great scenarios for long exposure photography. Obviously, without movement in the scene, long exposure photography does not differ from quick captures.
To emphasize the movement, try to find something stationary to show the contrast between stationery and movement.
Here is a checklist for shooting with long exposure and an ND filter;

The undesirable color cast effect of ND filters
Even the best ND filters will create a color cast in your images which you do not want. How do you get rid of ND Filter color casts? The easiest way to remove the color cast from an ND filter is to select the Auto White balance selector in Adobe Lightroom. Choose an area that should be white, like a cloud, to automatically adjust the white balance. Click on the color picker in Lightroom (this tool looks like an eyedropper). Next move your mouse onto a position where the area should be white, or neutral (grey) colors. Lightroom will take a 5-pixel by 5-pixel sample of those colors and automatically change the white balance so that those pixels move as close to grey as possible. Adjusting to a grey color in the mid-tones is usually the best way to get the colors right. Therefore landscape photographers often bring along a grey card to make sure they’re getting the most accurate colors possible.
Always shoot in RAW. A jpeg photo is compressed, and you will not be able to adjust the colors in the right way.
Why do ND filters cause color casts?
Neutral Density filters are created to reduce the amount of light that enters the camera, but they do not completely block the light. ND filters are produced with different colors. A ND filter is not created with a specific color. The good ones are as close to grey as physically possible, while the cheaper ones typically show a magenta cast which is much more difficult to correct in post-editing.
Which filters have the worst casts?
When you wonder which filters cause the worst casts, you should know
What ND filters should I use?
Filters are placed in front of the camera lens, and sometimes in between lens and camera.
There are many types of filters.
Most filters are circular (round) and you can attach those directly to your lens. If you want more filters for more lenses, you might need step-up rings. ND filters typically fit on a certain size of the diameter of the lens itself. Step-up rings are screw-on adapters that help fit larger filters onto smaller lenses.
Square filters are also a great option. You can insert those in a metal frame in front of your lens.
Clip-in filters are filters that are attached in front of the camera’s sensor. In this way you can attach any lens on your camera. The downside is you might not want to change lenses outdoors when you have less great weather circumstances.
You would have to decide what would work best for you and get a starters kit. Usually, you want to start with a 3-stop, 6-stop and a 10-stop filter. Begin with taking photos, change the shutter speed and adjust the ND filters accordingly to your exposure settings. When you have more experience, you should have a further look into what else you need would like to photograph and if you need more ND filters.
When you want to capture birds flying around a person, you should decide where you want to capture the scene.
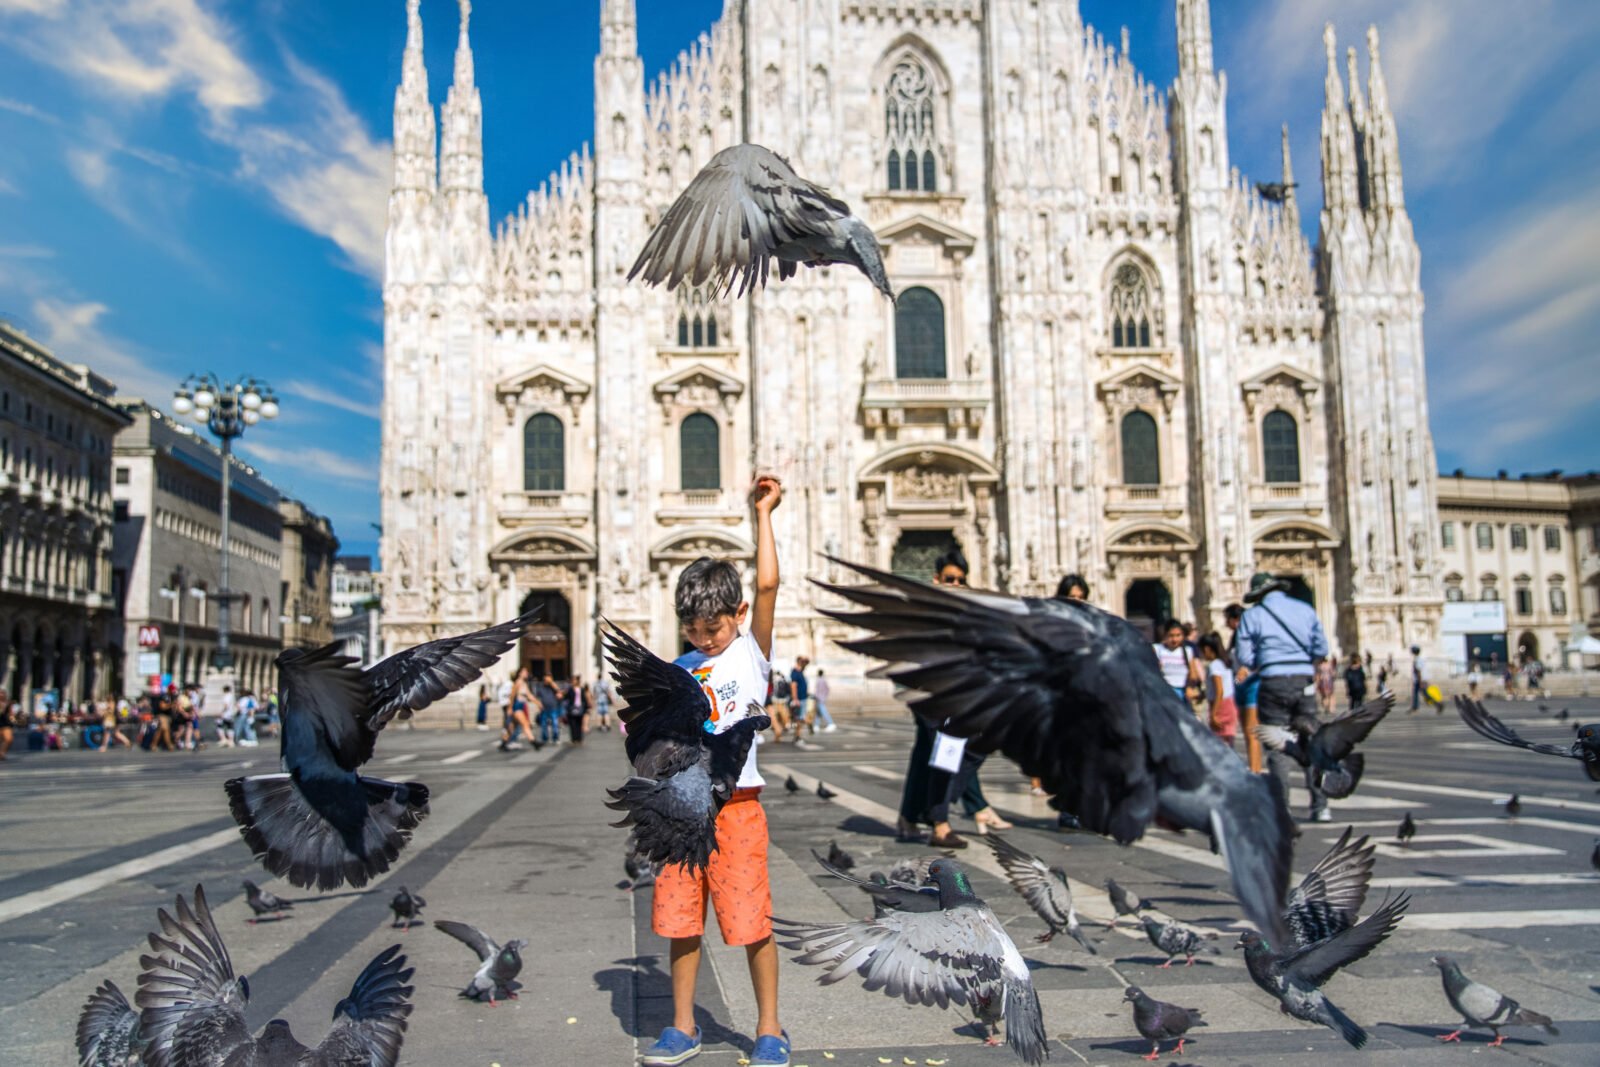


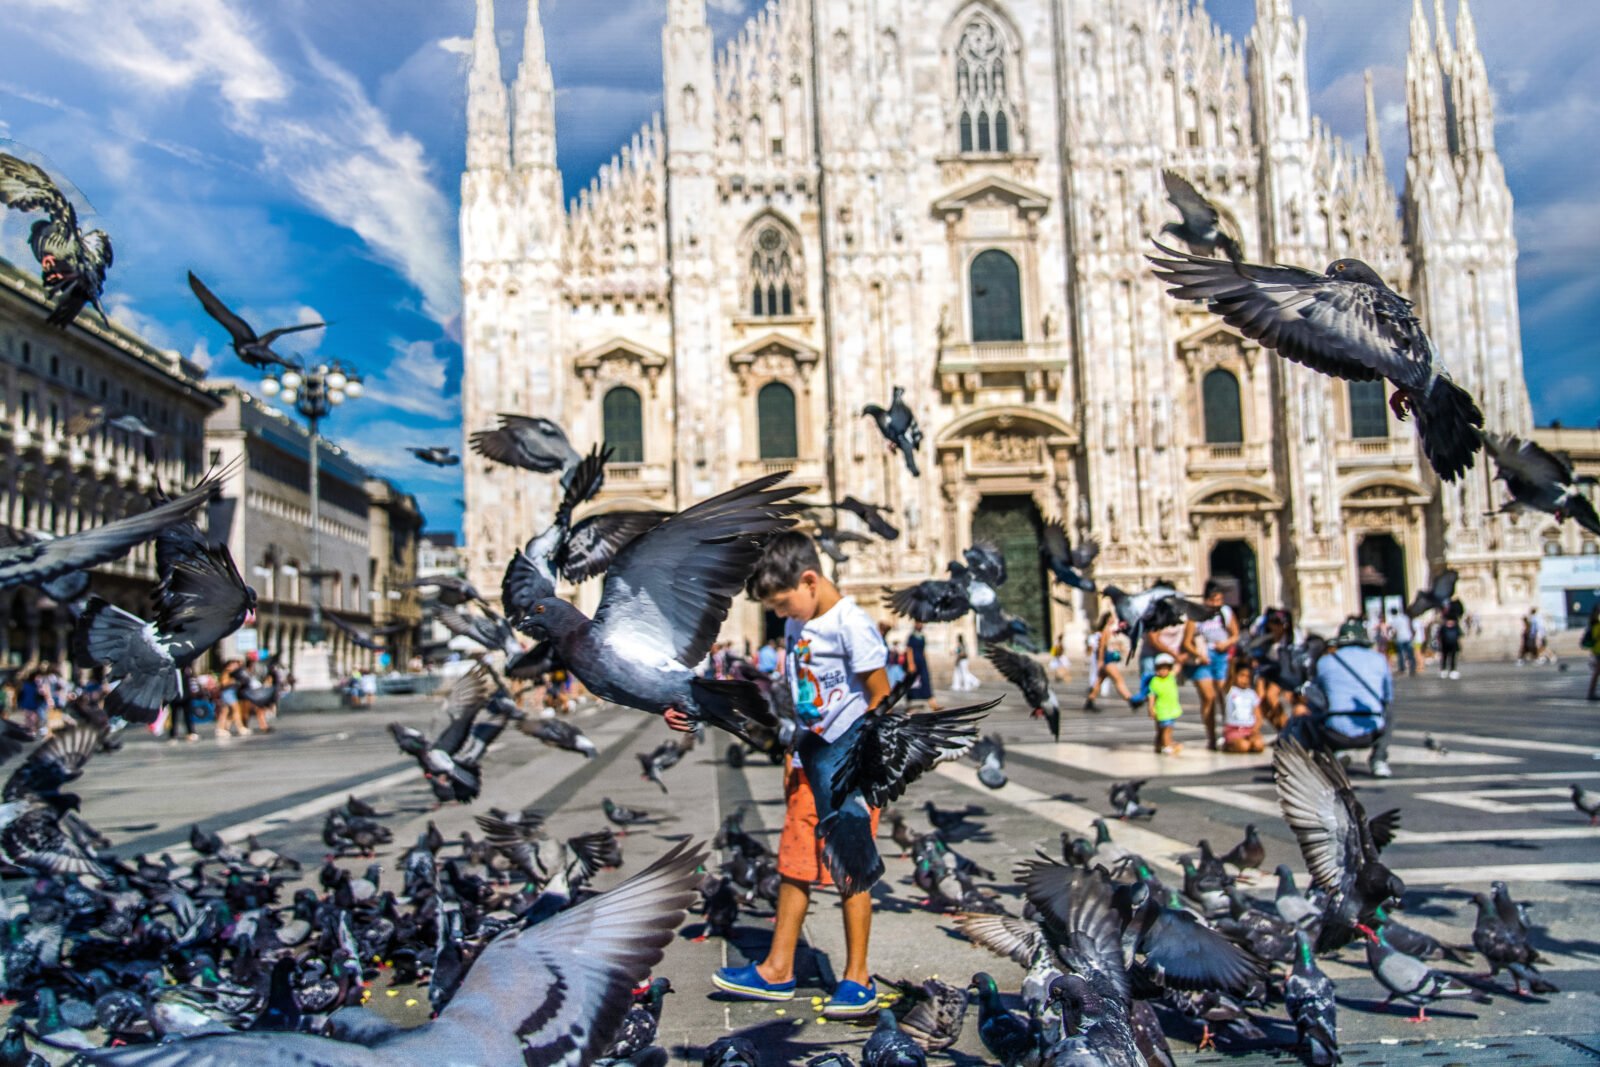
I photographed my youngest son at Piazza del Duomo in Milano. He attracted the pigeons by throwing two hands full with pieces of bread in the air at once. They flew all around him, he was not scared and it was such an exciting scene to watch! I didn’t have issues with the brightness of the photos since this was shot in broad daylight. I chose to shoot in Manual mode , but shutter mode is also possible.
